How to Make a Gourmet Chocolate Fountain with Premium Chocolate
Imagine a gathering where the centerpiece isn’t just a table or a bouquet, but a swirling cascade of rich, velvety chocolate. A gourmet chocolate fountain adds an element of excitement and indulgence to any event, making it the ultimate attraction for chocolate lovers. Crafting your own chocolate fountain experience at home can be surprisingly simple, especially when you know how to select premium chocolate and set it all up flawlessly. In this guide, we’ll walk you through everything you need to know to create a decadent chocolate fountain that’ll have everyone raving.
Gather Your Essentials: Tools and Premium Chocolate Choices
First things first, let’s talk about what you’ll need to get started. The most important item on your list is, of course, the chocolate fountain itself. You can find various sizes and styles online or at party supply stores, so pick one that fits your occasion. You’ll also need a sturdy table, a power outlet nearby, and some receptacles to catch the drips—because nobody wants a chocolatey mess!
Once you’ve secured the fountain, it’s time to think about the star of the show: the chocolate. Not all chocolate is created equal, and for a gourmet experience, you want to choose premium chocolate that melts smoothly and has a rich flavor. Look for high-quality couverture chocolate, which is made with a higher cocoa butter content. Popular choices include dark, milk, and white chocolates from premium brands; consider even experimenting with flavored chocolates or blends to add a unique twist to your fountain.
In addition to the fountain and chocolate, gather some essential tools: a spatula for stirring, a large bowl for melting, and skewers or bamboo sticks for dipping. Having everything in one place will streamline your setup, making it easier to focus on enjoying the moment rather than scrambling around for supplies.
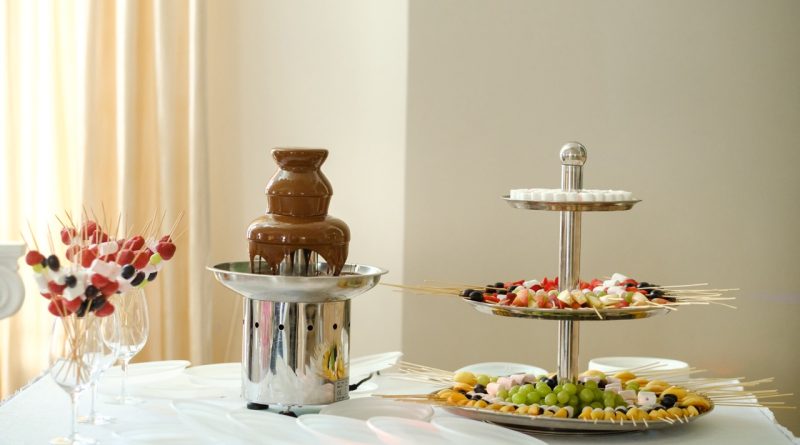
Setting Up Your Chocolate Fountain Like a Pro
Now that you have all your essentials, it’s time to set up your chocolate fountain for maximum impact. Start by selecting a location that allows for easy access and visibility; after all, you want your guests to be able to admire the flowing chocolate. Make sure the fountain is on a flat, stable surface to prevent any wobbles or spills. If you’re using an extension cord, ensure it’s safely out of the way to avoid tripping hazards.
Next, follow the manufacturer’s instructions to assemble the fountain. This usually involves setting up the tiers and ensuring that the motor is functioning correctly. Once it’s all set up, pour the melted chocolate into the basin and turn the fountain on. The beautiful flow of chocolate will create an eye-catching centerpiece that draws guests in like moths to a flame!
Lastly, consider the ambiance surrounding the fountain. Soft lighting can create a romantic feel, while vibrant decorations can enhance a festive atmosphere. Adding some fresh flowers or themed decor around the fountain can elevate the overall presentation. Remember, the more inviting your setup is, the more likely guests will be excited to partake in the chocolatey goodness.
Perfecting the Chocolate: Melting Techniques and Tips
Melting chocolate correctly is crucial for achieving that perfectly smooth consistency that makes a chocolate fountain irresistible. There are several methods you can use, but the most popular are the double boiler and microwave techniques. If you’re using a double boiler, fill the bottom pot with water, bring it to a gentle simmer, and place your chopped chocolate in the top pot. Stir gently until it’s melted and silky.
If you’re short on time, the microwave can be a quick alternative. Simply place your chopped chocolate in a microwave-safe bowl and microwave it in 15-30 second intervals, stirring in between to ensure even heating. Be cautious not to overheat the chocolate, as it can seize and become grainy. Aim for a smooth, glossy finish—a sign that your chocolate is ready to cascade down the fountain!
To achieve the right consistency for your fountain, you might need to add a bit of oil or cocoa butter to the melted chocolate. This helps it flow smoothly without clogging the fountain mechanism. About one tablespoon of oil per cup of chocolate should do the trick. Experimenting with different types of chocolate and ratios will help you find the perfect blend for your taste and your fountain.
Dipping Delights: Best Foods for Your Chocolate Fountain
Now comes the fun part: choosing what to dip into that luscious chocolate! The best dipping items are those that have a sturdy texture and appeal to a variety of tastes. Fresh fruits like strawberries, bananas, pineapple, and apples are perennial favorites. Their natural sweetness pairs wonderfully with the rich chocolate, creating a deliciously balanced treat.
For those who prefer something a bit more indulgent, consider adding marshmallows, pretzels, or cookies. Marshmallows, in particular, offer a fun, gooey experience when dipped into warm chocolate. Pretzels introduce a delightful salty crunch that contrasts beautifully with the sweetness of the chocolate, while cookies or biscotti add a lovely crunch and flavor.
And don’t forget savory options! Some adventurous souls enjoy dipping potato chips or even bacon into chocolate. It might sound unusual, but the combination of salty and sweet can be surprisingly addicting! Providing a mix of sweet and savory dippables ensures that there’s something for everyone, making your chocolate fountain an unforgettable treat for all guests.
Creating a gourmet chocolate fountain at home is an exciting endeavor that not only elevates any gathering but also offers a unique and interactive experience for your guests. With the right tools, premium chocolate, and delicious dipping choices, your fountain is sure to be the star of the show. So go ahead, whip out that fountain, and let the chocolate flow—your friends and family will thank you for it, and you might just find yourself with a new go-to for any celebration!